Background story:
When I was a kid I wore headbands all the time.
But I took them off around lunch time because that’s about as long as I could stand them!
Recently my daughter and I have been wearing headbands on our
”oh crap, we got up way too late… quick, bobby pins and headband day!”
It wasn’t too long before Liv confirmed my childhood memory…
they hurt like crazy!! So this is the remedy.
Knit headband = soft.
Adjustable back = no more headband headaches.
Headband Pictures
This tutorial is intended for beginners so is very detailed.
If you are a knitter and know how to make an i-cord just skip to the bottom.
If you've never knit before this tutorial is for you!
This is a very easy and fast project, enjoy!
Materials:
worsted weight yarn, two US7 double pointed needles (dpn's),
tape measure, tapestry needle and hair band.
Instructions:
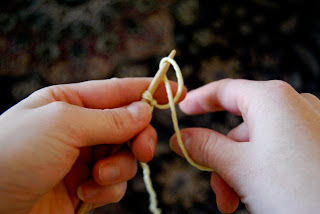
Slip knot.
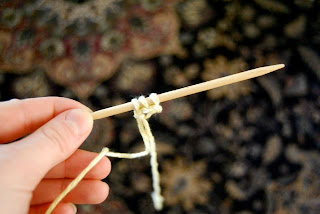
Place your slip knot on your dpn.
Cast on two more stitches (sts). Loop the yarn around your thumb...
...then place on your needle next to the first slip knot st.
You now have 2sts total.
Now you're ready to knit your i-cord.
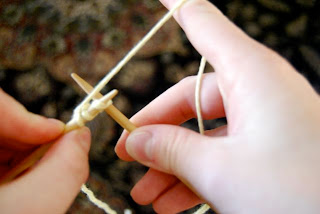
Place your other needle through the left side of the first st...
Wrap yarn counter clockwise around the needle
you just placed into the st on the left needle.
pull that wrapped loop through the st that's on the left needle...
now drop the left sts off...
Your new sts is now on the right needle
and you have 2 sts left to knit on the left.
When you have finished knitting all 3 sts
and they are all now on the opposite needle...
...push all 3 sts over to the other point on that same needle.
You are now going to knit all 3 sts again..
but you are going to pull the trailing yarn from
the last st over to knit the first st.
This closes the gap and creates a tube... aka, an i-cord.
As your i-cord grows pull down on the cast on tail
to keep your sts uniform.
When your i-cord is 13" for kids and 15-16" for adults,
it's time to bind off your 3 sts.
Knit the first 2 sts.
(just as you have been doing)
Now take the first sts and pull it over the second
and OFF the needle.
Repeat so that you have 1 sts on your needle.
Pull that last sts very loose, cut yarn leaving
a long tail for sewing to the hair band.
Place the cut end through the big loop and pull tight.
a long tail for sewing to the hair band.
Place the cut end through the big loop and pull tight.
Using your tapestry needle, secure each side to the hair band.
Your headband is now adjustable because of the stretch and
no more headaches from a headband that's too tight!
Add another i-cord if you want to make the one pictured.
You can add flowers or feathers or jewels... whatever you
want to make it yours. Have fun!!


